Retool is a powerful platform that enables rapid internal tool development, leveraging pre-built components and connecting to various data sources. However, when it comes to creating an editable interface for modifying multiple data entries at once, there are some gaps in official documentation. While Retool’s table component offers editable features, it’s not always ideal for handling complex or multi-field data structures. This is where the List View component becomes extremely useful. This article explores how to create an editable List View in Retool, allowing you to modify data efficiently.
Why Use List View Instead of Editable Tables?
Retool’s table component is great for quick edits to tabular data, but it has its limitations. Here’s why the List View can be a better alternative:
- Complex Data Structures: In a table, each row is limited to displaying data in a linear format. If your data involves multiple fields or more complex relationships, the table quickly becomes crowded.
- Flexible Layout: With List View, you can display multiple input fields per list item. Instead of being constrained to rows and columns, you have the flexibility to organize your data inputs however you like—inside containers, side by side, stacked, etc.
- Better User Experience: List Views offer smoother editing for multiple rows and better input validation, giving you more control than editable tables for accurate data entry.
The Problem: Editing Data in List View
Retool’s List View component has some limitations when it comes to editing data. While it does have a “data” property that contains the current data supplied by the attached data source, it lacks a “changeset” property—unlike the Table component. The “changeset” property in tables automatically tracks and records any changes made by users, making it easy to capture edits.
In the List View, however, there is no built-in mechanism to detect or track changes to individual items. This means developers have to manually handle capturing and updating the modified data when building an editable List View. Despite these challenges, with the right configuration, it’s still possible to work around this limitation and create a fully functional editable List View.
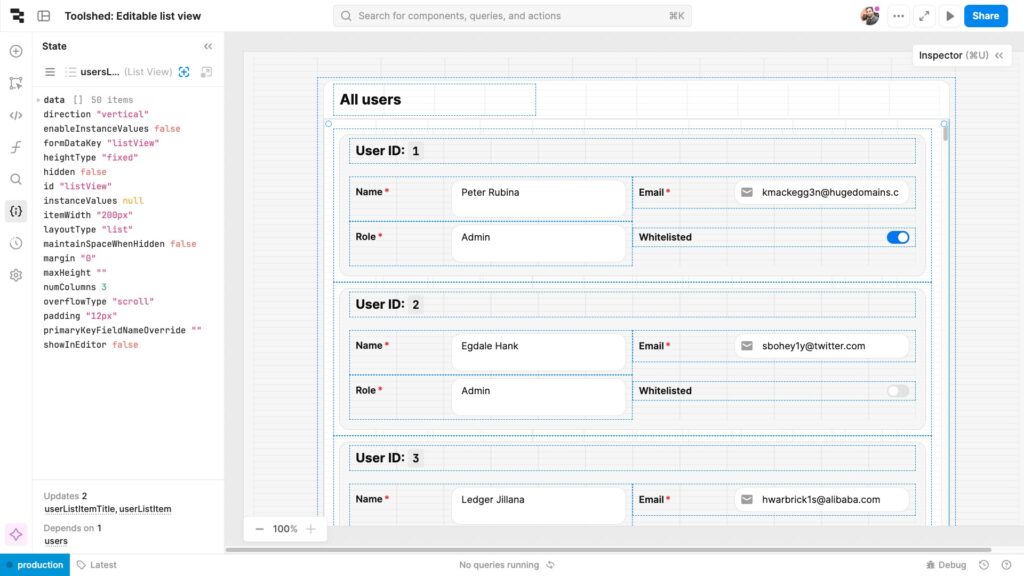
Steps to Create an Editable List View in Retool
Since Retool’s List View component doesn’t natively support a changeset property like the Table component, we’ll use a variable as a workaround. This variable will act as a proxy for tracking changes in the List View, and because it’s mutable, any changes made to the data will update it in real time.
Follow these steps to create an editable List View:
1. Introduce a proxy variable
The first step is to create a variable that will store and track the data being edited in the list View. You can name this variable something like userListViewChangeset. This variable will act as a proxy for the actual data source, storing the current data and reflecting any updates made by the user.
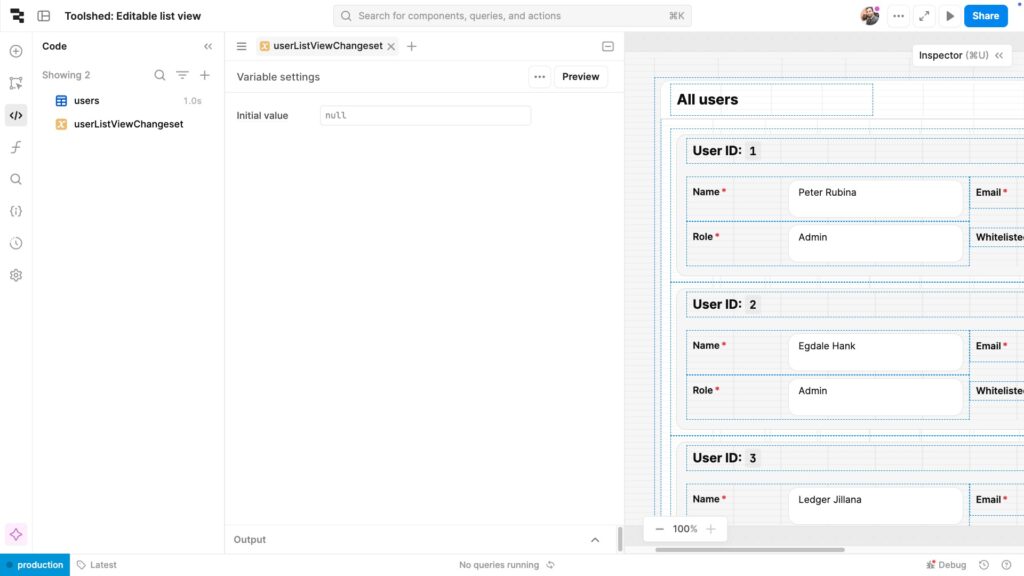
2. Initialize the variable with original data
Next, set the initial value of this variable. Use the data fetched from the query originally used as the data source to set this initial value. In our example we had a DB query users. So, we will set users.data as the Initial value of userListViewChangeset.
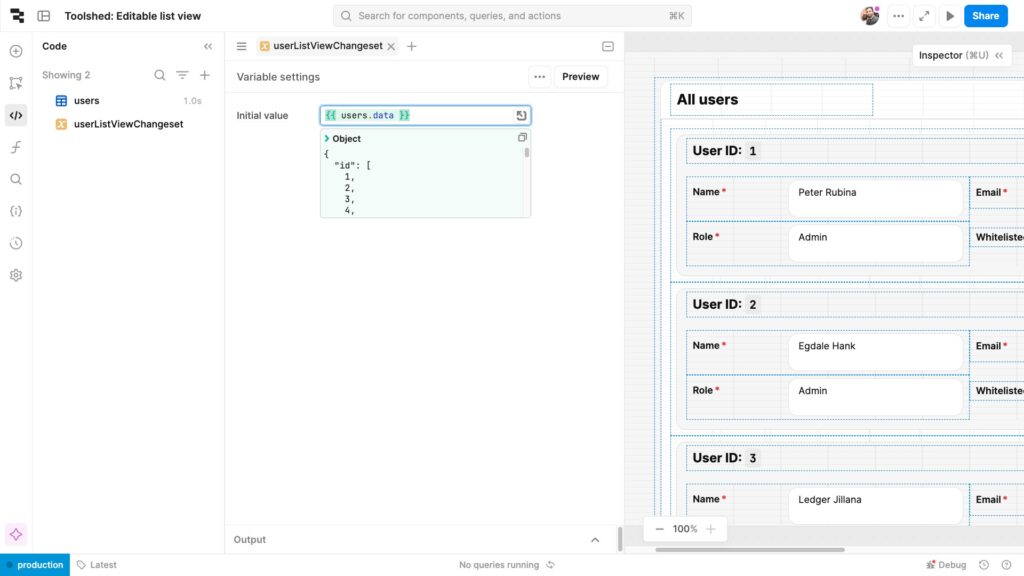
3. Use the Variable as the List View’s Data Source
After initializing the variable, assign it as the new data source for the List View. This will ensure that the List View displays the data stored in the userListViewChangeset variable. Since this variable is mutable, any changes will propagate back into the List View automatically.
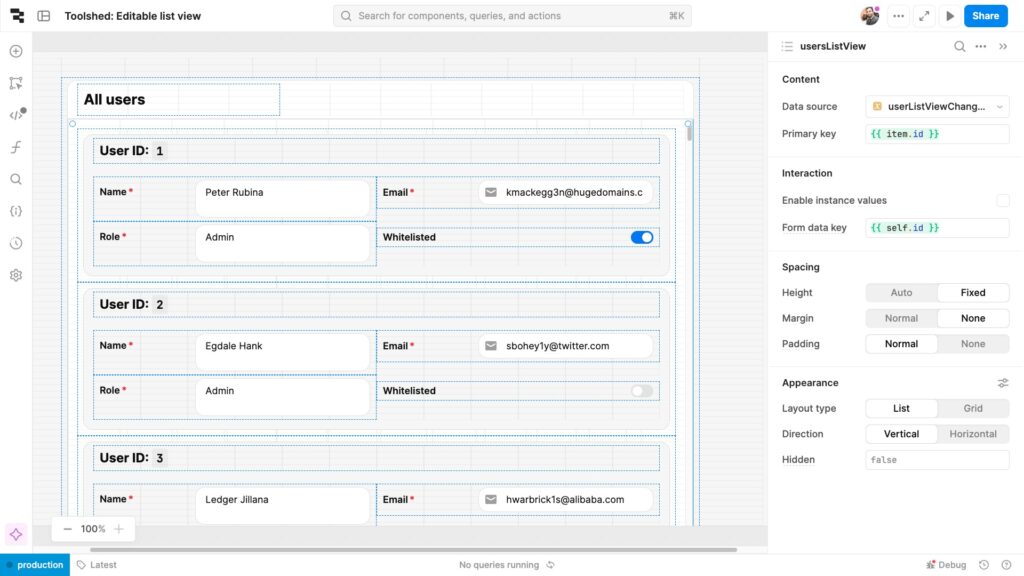
4. Update the Variable When Inputs Change
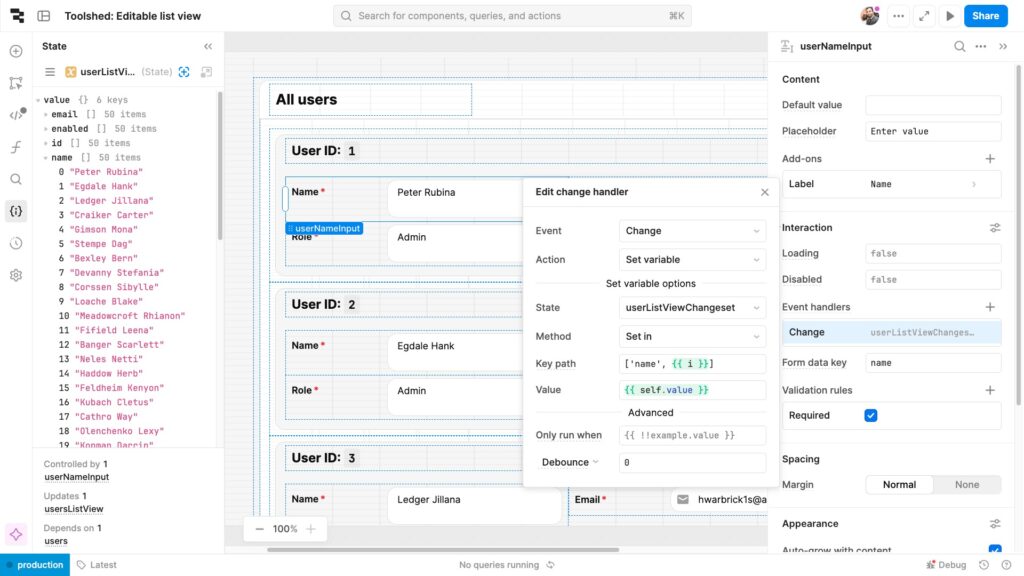
To make the List View editable, you need to configure a change event handler for each input component inside the list item, ensuring it updates the userListViewChangeset variable whenever a value changes. This allows the list view to reflect real-time updates.
To set this up, select the input component, add a “change” event handler, and use the setIn method to update the relevant field in the userListViewChangeset variable. This step ensures the data is dynamically updated as users interact with the inputs.
This is the most labor-intensive part of the setup, as you’ll need to manually add a change event handler to each input component within the list item.
Tip: The key path for updating the variable will depend on your data structure. For more detailed instructions on setting variables in Retool, refer to the official guide.
5. Propagate Changes Back to the List View
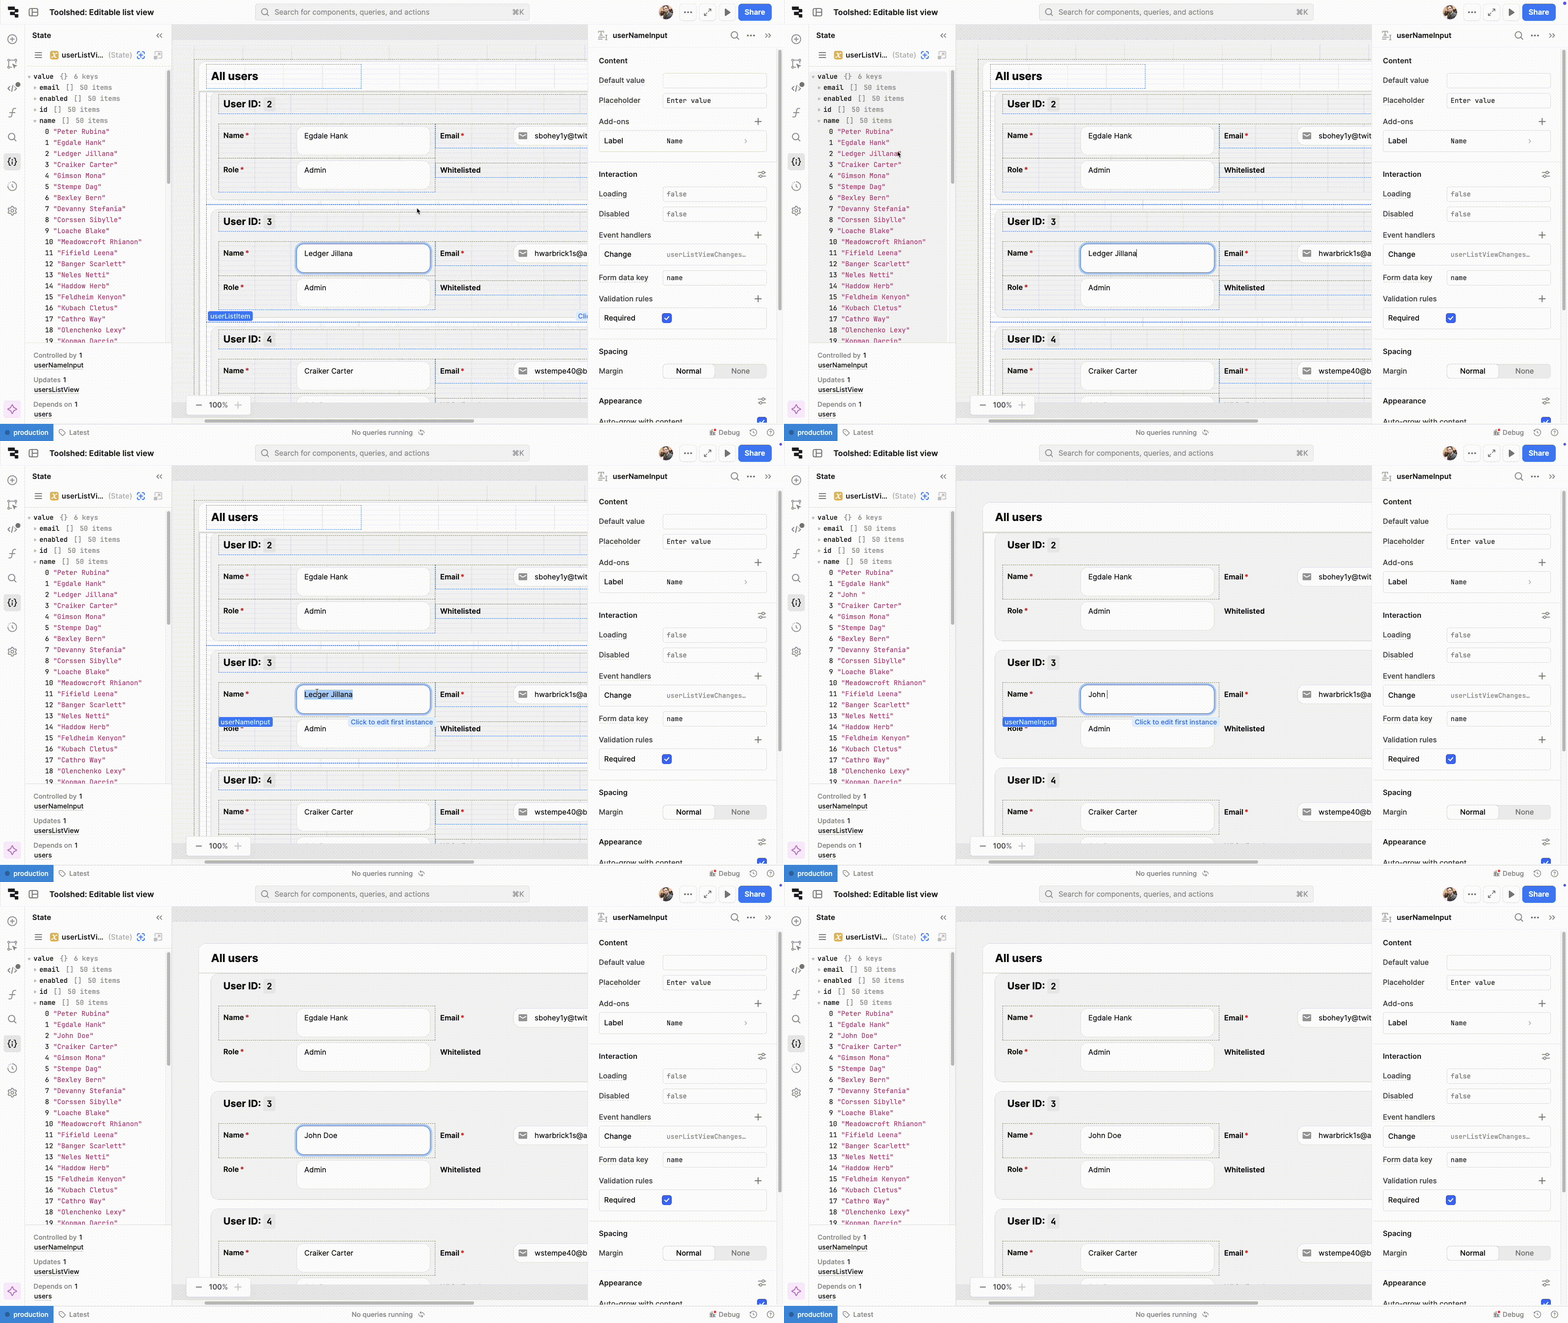
Since the userListViewChangeset variable is both the data source and the changeset, any updates made through the inputs will automatically reflect in the List View. This allows users to see real-time changes without needing to refresh or reload the view.

6. Save or Submit the Changes
Finally, after the necessary edits have been made, you can implement a save or submit action to persist these changes to your backend. This could be done using a query that updates the database with the modified data from the userListViewChangeset.
Other Methods to Edit Data in Retool
Although this article focuses on the List view, it’s important to understand the broader context of data mutation in Retool. Retool provides several components that allow you to create, edit, or delete records in your database. Here are a few of them:
- Forms: You can use forms with input components such as text inputs, drop-downs, and selects to gather and submit data. Forms work great for single-row operations, like adding or editing one record at a time.
- Editable Tables: As mentioned earlier, Retool’s tables can be made editable by enabling the ‘Editable’ option. You can modify the content of each cell, and Retool will generate SQL queries or API calls to update the underlying data source. While effective for simple data manipulation, editable tables struggle with large data sets or complex UX layouts.
- List View: Finally, the List View component provides an advanced level of flexibility. Each item in the list can include any combination of inputs, making it ideal for cases where multiple fields need to be updated at once. With List View, you’re not restricted to a linear row format, which is a key advantage.
Benefits of Using Editable List Views in Retool
Editable List Views offer a more flexible alternative to traditional table layouts in Retool, especially when working with complex data structures. They provide a user-friendly interface for internal tools, making it easier to update multiple data entries at once. Unlike tables, List Views aren’t limited to rows and columns, allowing you to customize the layout with grouped inputs, additional fields, and a more intuitive design.
For teams that need to handle frequent data updates, editable List Views can significantly improve the user experience by making data interaction smoother and more adaptable.
Conclusion
Editable List Views in Retool give you greater flexibility when working with complex data. Whether you’re building internal tools or user-friendly interfaces, they help streamline workflows and improve efficiency. Though Retool doesn’t natively support this feature, the approach discussed in this guide allows you to create dynamic, editable List Views that enhance productivity.
If you’re looking to accelerate your Retool development or need expert assistance, Toolshed offers tailored solutions to help you build powerful, efficient internal tools. Contact us today to learn how we can help optimize your workflows and drive productivity.


Leave a Reply
You must be logged in to post a comment.